
We've got a new Invoice Template Editor Training Video available now, check it out!
Contents
I. Introduction
II. Setup
III. Combo Data Rows
IV. Projects > Debts Data Rows
I. Introduction
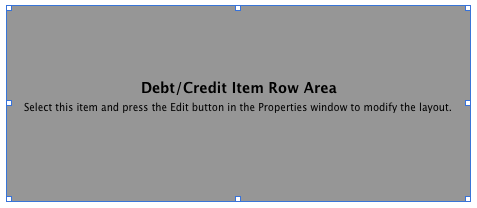
Data Rows are a specified area on an invoice or report template that will show a repeating "row" of variables and information for a specific set of items (such as work items, payments, categories, etc). The gray area in the screenshot below designates where on the main template the data row will appear:
Selecting the area and pressing the "Edit Data Row" button will bring you to an editor that will show the actual variables that will be presented for each item in the data row area. Think of it as sort of a "template within a template":

When this specific template is generated, the template will show the associated "ItemDate", "ItemName", and "ItemAmount" information for every item in the invoice or report.
The main advantages to Data Rows over Data Columns are the ability to make a must more customizable display of information, and also the fact that data rows can stretch vertically to fit information (such as a very long item description).
II. Setup
Similar to data columns, if you intend to create multi-page invoices you will have to insert a Data Row Area on each page of your template (initial page and the subsequent "repeating" page). The are will appear as a gray box with the Data Row type in text in the middle of the area.
To edit the content of the data row, select the area and press the Edit button in the properties floating window. This will bring up the data row's template-within-a-template editing area where you can create a miniature template that will be used for each of the items in your data area.
This template gives you the ability to put variables that were restricted to Data Columns directly into variable items. ItemAmount, for example, can be places anywhere on the row and will be located in that position for each item associated with the Invoice or report.

Additional position settings are also allowed for items within the data row. Next to the "Top" setting, which controls how many pixels an item is from the top of the template, there is a popup menu where you can select if the item is locked to the top or the bottom of the data row. Data rows can expand vertically to fit additional data so if you'd like a line, for example, to be at the bottom of every item you would select lock bottom and place it near the bottom of the data row.
Next to the "Height" setting, which controls the height of the item, there is a popup menu where you can select if the item is a constant height or if it expands vertically to fit additional data (flexible). If you have the ItemExtraInfo variable, for example, and you set it to Flexible, Studiometry will automatically expand the item as well as the data row to fit all of the information that is available for that variable. If you have no variables set to flexible then all data rows will maintain a consistent height or your selected Minimum Row Height.
If you select Flexible for an item in a Data Row that isn't a variable, such as a Text or Graphics object, the item will be stretched vertically to appear as many pixels from the top and the bottom as it appears in the editing area.
On a side note, you can only create one Data Area for each type (Debt/Credit, Category, Employee, Tax, or Taxes with Value) on an invoice. This means that your Debt/Credit Data Row area will be uniform throughout your Invoice, and while you can have multiple areas on the same Invoice (on the same page or on multiple pages) editing any of these areas will make the same modifications to all other areas of the same type.
III. Combo Data Rows
New to Studiometry 10.0 is the ability to create Combo Data Rows. These are special types of data rows that let you combine one or more types of data into the same data row area. This can be useful if, for example, you want to display a summary of categories, followed by individual work items, followed by your invoice totals. The combo data row will present each data type sequentially, giving you the ability to reposition elements of your invoices and reports based on the content of the data rows.
Creating Combo Data Rows
To add a combo data row to your template, click the New Data Row toolbar button, then select the data row area and, in the properties section under "Data Row", select the Row Type of "Combo Data Row". The interface will now update from a simple "Edit" button, to the Combo Data Row organizer, as pictured below:
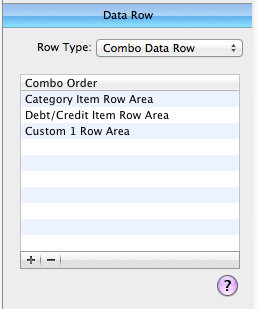
Sequential list of data types that will appear within this Combo Data Row.
In the screenshot above, the Combo Data row will first show all Categories for the associated invoice, then list out each individual Debt/Credit, then display the Custom 1 Row Area.
Modifying the Types, and Order of Data in a Combo Data Row
Once you have your Combo Data Row selected, you can use the Plus (+) button to add a new data type to the Combo Data Row. Selecting a type will cause it to appear in the sequential list of data types. You can drag and reorder the types to modify the order they will appear on a generated invoice or report. You can also remove items by selecting them within the sequential list and pressing the Minus (-) button.
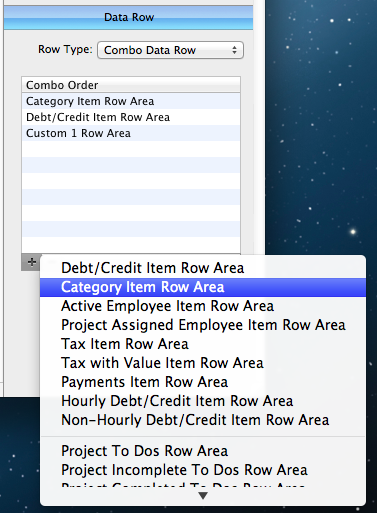
An example of the available Data Row types within the Combo Data Row.
Changing the Design and Layout of Each Data Type in a Combo Data Row
Simply double-click on any Data Type within the sequential list of items in the Combo Data Row to setup the way each Data Type will display within the Combo Data Row. Double-clicking "Category Item Row" from the list, for example, will bring you to the layout for modifying the variables and text that will display for each Category shown on the invoice.
You can customize each row type to have it's own layout, but keep in mind that they will display sequentially, so it is a good idea to have a cohesive design between all of your different types in a combo data row.
Adding Totals, Dividers, Headers, Footers
If you would like to include within your Combo Data row a space for invoice totals, dividers, headers, footers, or any other content that will be positioned intelligently, you will want to utilize the Custom Row Areas. To do this, click the Plus (+) button to add a new data type to your combo data row, and then select "Custom (1-10) Row Area". You can have up to 10 custom designed rows per template.
Once you've added this to your Combo Data Row, double-click on the Custom Row Area within the sequential list and you will be brought to the template editing section for that specific row. You can then add whichever variables, images, and text that you would like to have appear within the custom row.
Using custom rows is a great way to do any of the following:
- Setup your template so that the totals appear directly under your work items, instead of at the very bottom of the page.
- Display flexible amounts of text with items appearing immediately underneath. Especially useful for project or invoice notes, report fields, etc.
- Display a header with labels for data row type that follows the Custom row. Just setup a custom row to appear before your work items, for example, and you can display the column headers for all of the variables that will appear within your work data rows.
- Add content or pictures inline within your template that are not related to to specific items on your invoice or report
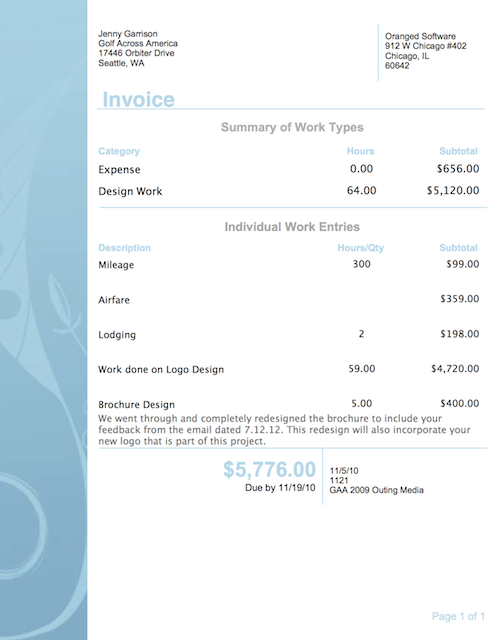
Example Combo Data Row Output
We setup a sample template with the following Data Types in a combo data row:
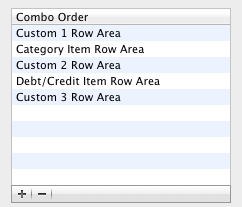
- Custom 1 Row Area contains the header information for the Category Item Row
- Category Item Row Area will display information about each category that is associated with the invoice
- Custom 2 Row Area contains the header information for the Debt/Credit Item Row Area
- Debt/Credit Item Row Area will display information about each work/expense item that is on the invoice
- Custom 3 Row Area contains the totals and due date information presented at the bottom of the invoice

IV. Projects > Debts Data Rows
Studiometry 11 and later have the ability to create Multi-Project invoices and reports that group the Debt/Credit items based on their associated project. The Projects > Debts Data Row is similar to a standard Combo Data Row in that you can setup multiple item types to display in order. There are key differences between Combo Data Rows and Projects > Debts Data Rows:
- Projects > Debts Data Rows must aways begin with the same three row types: 1) Project Headers. 2) Debt/Credits. 3) Project Footers
- These items cannot be removed or reordered. But you can add customizable row types after the three default rows types
Studiometry will automatically group all Debt/Credit items for a project within a Project Header and Project Footer. Projects are ordered based on when they first show appear within the Invoice/Reports ordered Debt List.
0 Comments