
Tutorial Introduction
Accounted is a powerful solution with many of the features seen in more expensive accounting programs, but with the ease of use of a much smaller application. Powerful features such as double entry accounting, accounts receivable/payable, split transactions, and check printing are included. But we also focused on the interface and user experience. Accounted includes many small touches, such as the "totals ticker" that instantly shows several totals at the bottom of each account. You could easily, for example, view and compare the total income of a certain type for this month, last month, this fiscal quarter, this fiscal year and more without making any mouse clicks.
Accounted keeps track of your ![]() Accounts,
Accounts, ![]() People, and
People, and ![]() Transactions. Accounted also generates reports and charts for summarizing your information.
Transactions. Accounted also generates reports and charts for summarizing your information.
Double Entry Bookkeeping
Double entry accounting is used in most accounting packages because of the ability to easily calculate income and expenses. Basically, double entry accounting simply means that each transaction is associated with at least two accounts. For example, if you sell an item, money will be "taken out" of the income account "Sales" and put into your bank account. This allows you to easily view and total both the balance for your bank account, as well as the amount of sales for any time period. Income and expense accounts are similar to categories in single entry accounting systems, but they are more strict and generally more accurate when producing reports.
The diagram below show a basic account setup with two bank accounts, an income account, and an expense account.
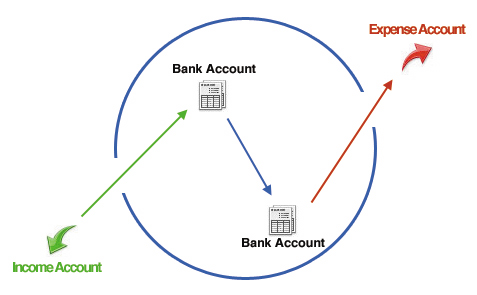
The items inside of the blue circle are your assets, including bank and cash accounts. Outside money can only enter your company via income accounts. Sales you make and services you provide come in to your company's accounts via income accounts, designated as the green arrow. You can transfer money between accounts within your company, shown as the blue arrow. When you purchase an item or pay a bill for your company, the money goes out of your company to an expense account, show as the red arrow.
Income, transfers, and expenses are all types of transactions that simply go to or from different account types.
Income - From an income account to a Bank/Cash/Credit account
Transfer - From a Bank/Cash/Credit account to another Bank/Cash/Credit account
Expense - From a Bank/Cash/Credit to an expense account
As you can see from the diagram, a transaction cannot be made between an income account and an expense account.
Wikipedia Article on Double Entry Bookkeeping: Link
Expense/Income Accounts
Expense and Income accounts are used in Accounted to show money going out of or coming into your company's Accounts. These types of accounts are used for totaling your yearly income and business expenses for tax purposes, for example.
Income and expense Accounts do not carry a balance, as they are basically limitless sources of income and expense. When you pay your company's phone bill, for example, you create a transaction in the amount of $150.00 from your bank account to the expense account titled "Telephone." The transaction will take $150.00 out of your bank account and modify the bank account's balance to reflect the payment. The transaction will then "add" $150.00 to the expense account for the specified date of the transaction. This allows you to total your expenses for this expense account based on month, quarter, year, etc. As the $150 has left your company via the expense account, a running balance is not kept for the expense account.
Being that a transaction must move money from one account to another, transactions cannot be made between income and expense accounts. Since neither account carries a balance, the movement of money would not be correctly recorded. Instead, you would make one transaction showing the money going from an income account into a bank account, and then another transaction from the bank account into the expense account.
Main Window
The Accounted main window is where most of your editing will occur. The window has a sleek design meant to show you a large amount of information without being overly cluttered.
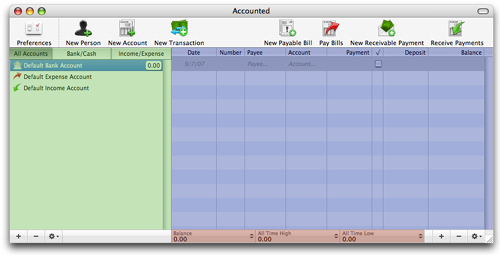
The main window is divided into 3 sections, highlighted in the screenshot as green, blue, and red.
Green - The left side of the window show your accounts, their types, and their balances (if the account type carries a balance). The buttons above the account list allow you to filter the list based on account types. Double click on an account to edit the account's properties, or right click on an account to perform several other actions. Click on an account to select the account and show any transactions attached to the account in the blue section.
Blue - The blue section shows the list of all transactions for the selected account. Transactions can be created and edited directly in the main window, or double-clicked on to edit in a separate window. Several options for the account lists are available in the Preferences window.
Red - The red section show the totals and/or balances for the selected account. Depending on the width of the window, Accounted will automatically show or hide additional total fields. You can easily select the total for each total column by simply clicking and selecting on your desired total. As stated previously, expense and income accounts do not maintain a balance, so it is recommended to select periodic totals such as months totals, yearly totals, and quarterly totals. Bank/cash/credit accounts can show their balance both in the transactions list as well as in the totals section.
Transactions
A transaction is simply the movement of money from one account to another. A transaction between two bank/cash/credit account types is considered a transfer, because both accounts carry a balance. A transaction between a bank account and an expense account is considered an expense or payment, and a transaction between a bank and an income account is considered an income or deposit.
To create a new transaction, click the New Transaction toolbar item, the plus button underneath the transactions list, or select File Menu > New Transaction. Any of these options will bring up the new transaction window. You can also edit a new transaction in-line in any account's transaction list. A blank line is automatically added to the end of every transaction list, initially shown in italics to signify that it is not an actual transaction. Simply select the blank line (showing Payee... and Account...) and modify the desired fields to create the transaction. Based on your settings in the preferences window, Accounted will either ask to save when you press return, or automatically save when you press return or select another row.
The transaction lists provide a great, convenient way of editing transactions, however there are some things that must be done in the transaction editing window.
![]()
If you'd like to create or edit a split transaction, you will need to edit the transaction in the editing window. Each line in the window denotes a separate transaction all associated with the main transaction. More information regarding split transactions is available in the Transaction section of the help files.
Accounts Receivable/Accounts Payable
Accounts receivable and Accounts payable are used to show and record a future transaction. If you receive a bill in the mail, but have not yet paid the bill, for example, you would enter the item into your Accounts payable account. When you do pay the bill you would use the Pay Bills function in Accounted. This function shows a list of all items in all Accounts Payable accounts.
The same is true for Accounts receivable. If you send out an invoice or someone owes you money, you can enter the item into your Accounts receivable and then later receive the item when the payment actually comes in.
This setup is used by many companies but is not required by Accounted. It is up to each user whether or not they'd like to use Accounts Receivable and Accounts Payable.
Wikipedia Article on Accounts Payable: Link
Wikipedia Article on Accounts Receivable: Link
Reporting and Summarizing
After using Accounted to track your income and expenses, you can easily generate reports and charts summarizing your data.
Reports are used to summarize and total the amount of taxable, non-taxable, or all income or expenses. Reports will show totals and individual items for the selected account types based on the date range you have entered. These reports are very useful when generating tax reports at the end of your tax year, and also for quickly summarizing your income and expenses. More information is available in the reports section of the Accounted help files.


4 Comments